Ever catch yourself daydreaming about swimming laps without leaving home—then snap back to reality, remembering the price tag of in-ground pools? You’re not alone. The thought of building a home pool can feel out of reach for most of us.
Here’s the thing: when swimming’s your stress relief or main workout, not having that convenience stings. Drive-time to gyms, crowded lanes, unpredictable closures—every barrier chips away at your motivation and peace of mind (not to mention your wallet).
By the end of this guide, you’ll know exactly how to use an above ground lap pool guide to bring real swimming into your backyard—without draining your savings. The next few minutes will change how you see affordable at-home fitness solutions.
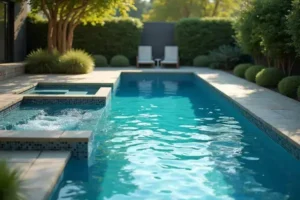
Why Choose An Above Ground Lap Pool For Home Fitness
Why should you really consider an above ground lap pool for your fitness routine? If you’ve wrestled with crowded public pools, unreliable gym schedules, or sky-high backyard construction quotes, you know the frustration is real. The truth is: swimming is one of the best low-impact workouts out there—offering muscle toning, joint support, and powerful cardio in one go. But making daily access part of your life? That’s where most home exercisers get stuck.
Here’s the thing: above ground lap pools solve several problems at once. They’re fast to install, usually in just days—not months. They take up a fraction of the landscape footprint of traditional in-ground options (hello, compact backyards!). And they’re dramatically more affordable, with prices typically 30–60% lower than the in-ground route according to the Association of Pool & Spa Professionals. That means more families get access, not just those ready to invest huge amounts upfront.
💡 Pro Tip: Choose a model with a dedicated swim current system (like Endless Pools’ Fastlane) for a truly lap-worthy experience—no need for Olympic-sized space.
- Lower Maintenance: Above ground designs usually require less structural upkeep, thanks to corrosion-resistant materials and simplified water filtration systems.
- Portability: Planning to move in a few years? Many above ground models can actually be disassembled and relocated—a key difference versus permanent concrete builds.
- Home Value: According to HomeLight, a well-installed pool (even above ground) can boost buyer interest in certain markets, especially where at-home fitness became a post-pandemic priority.
In practice: Picture this scenario—a client in a mid-sized suburb wanted daily swim access to treat an old ankle injury. Instead of saving for years, they installed a modular above ground lap pool over a single weekend, tuned the temperature for year-round therapy, and cut their gym membership bills for good. You gain both freedom and function.
| Feature | Above Ground | In-Ground |
|---|---|---|
| Install Time | 1-7 days | 4-12 weeks |
| Average Cost Range | $4,000–$18,000 | $30,000–$75,000+ |
| Flexibility | Moveable, adjustable size | Permanent, fixed size |
But there’s one detail most owners completely overlook until it’s too late…
Key Features To Look For In An Affordable Lap Pool
When you’re searching for an affordable above ground lap pool, it’s easy to get swept away by glossy product photos and sales talk. But what actually matters if you want a swim that’s satisfying, safe, and built to last? The answer comes down to specific features that influence everything from water quality to overall usability.
First, durability is non-negotiable. Look for reinforced materials—think heavy-duty composite walls or rust-resistant steel frames—that withstand year-round weather. The pool lining should be thick, UV-stabilized vinyl or similar. Next, swim track length matters. Standard models run from 20 to 40 feet, but even shorter pools become effective for fitness if you add a resistance current system. Pro tip: That add-on makes a smaller pool feel limitless.
💡 Pro Tip: Prioritize models with adjustable current jets. The Physical Activity Council recommends resistance swimming for building strength and cardio without needing a 50-foot pool.
- Filtration: High-quality filters remove debris and manage chemicals, protecting your water and your skin. Cartridge filters are effective and require less backwashing than sand types.
- Heating System: If you want to swim year-round, an energy-efficient heater—preferably with a digital thermostat—lets you maintain an ideal water temperature even in milder climates.
- Frame Construction: Corrosion-resistant hardware means fewer repairs and a much longer lifespan. This matters for anyone in humid or salty environments.
In practice: Imagine a family choosing between two similar-priced models. One offers only a basic filter, the other includes a variable-speed pump, sturdy rails, and a reinforced liner. Fast forward to year two—maintenance is easier, water’s clearer, and they’ve avoided costly repairs. It’s the details that decide satisfaction long-term.
| Feature | Why It Matters | Recommended Specification |
|---|---|---|
| Liner Thickness | Withstands active use | 30 mil or higher |
| Frame Material | Fights corrosion, adds stability | Powder-coated steel or composite |
| Current System | Enables lap-style training | Variable speed, flow 3,000+ gph |
But there’s one choice that most buyers regret only after the first summer. What actually works might surprise you…
Step-By-Step Setup: How To Install Your Above Ground Lap Pool
Wondering if you can really install an above ground lap pool yourself—and save serious money in the process? The answer is yes, but it pays to know exactly what to expect. With the right prep and patience, most handy homeowners can handle the basics in a weekend or two.
- Leveling sand or crushed stone (enough to cover planned pool area)
- Reinforced ground pad or tarp
- Pool kit (walls, liner, supports)
- Water source/hose
- Filtration system & pump
- Pool ladder or entry steps
- Basic tools (screwdriver, socket set, utility knife, shovel)
- Choose The Right Location: Select a flat, clear spot away from overhead lines and large trees, following zoning and manufacturer guidelines. Local building codes may apply, so check municipal requirements.
- Prepare The Base: Remove debris, then create a level base using sand or crushed stone compacted firmly. Lay down a reinforced ground pad to prevent liner punctures and improve stability.
- Assemble Pool Frame: Erect walls per the manufacturer’s instructions. Double-check that connectors are secured—no shortcuts here, especially for lap pools which handle regular water movement.
- Install The Liner: Carefully unroll the pool liner, smoothing out wrinkles. Attach it using top rails, making sure it’s evenly stretched (a warm day helps the vinyl relax).
- Fill With Water: Add water slowly, watching for shifting or stretching as it fills. Stop periodically to adjust and ensure even leveling, then add pool chemical starter kit as directed by official pool safety guidelines from the Pool & Hot Tub Alliance.
- Connect Filtration and Accessories: Hook up the filter pump, ladders, and optional resistance jets. Prime and test all systems before using for a workout.
⚠️ Important Warning: Always fence in any above ground pool—lap-size or not—to meet local safety codes and protect children, pets, and neighborhood peace of mind.
In practice: One client, eager for weekly lap therapy, started assembly on a Saturday morning with detailed checklists. By Sunday evening, the entire system was ready, and his first test swim happened just before sunset. The difference? Careful prep—and an extra set of hands at tricky steps.
And this is exactly where most people make the most common mistake…
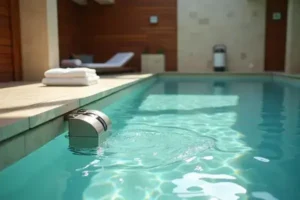
Maintenance Essentials To Keep Your Pool Swim-Ready Year Round
Ever jump into a pool in early spring, only to find the water cloudy, gritty, or tinged with a strange smell? Keeping an above ground lap pool crystal-clear and ready in any season is more about consistency than perfection. The truth is: maintenance isn’t overwhelming if you make the right moves regularly—and use a few pro shortcuts.
💡 Pro Tip: Invest in an automatic pool cleaner or robotic vacuum. According to the Pool & Hot Tub Alliance, these reduce manual debris removal by 80% and help distribute chemicals more evenly, leading to healthier water with less hassle.
- Test and Balance Water: Weekly test strips or digital meters check chlorine, pH, and alkalinity. Ideal levels: pH 7.4–7.6, chlorine 1–3 ppm. Out of range? Shocking the pool with a stabilized chlorine product fixes cloudy water fast.
- Clean Filters: Rinse or replace cartridge filters every 2–4 weeks. Neglecting this step is the number one reason for stalled flow and murky water by midsummer.
- Vacuum and Skim: Skim leaves at least once a week. Vacuum the floor for dirt and sediment—especially after storms or heavy winds.
- Winterize or Cover: In colder climates, lower water below skimmer, remove hoses, and use a winter cover. In warmer zones, a solar blanket keeps debris out and water warm for early-morning laps.
In practice: Picture this scenario—Avid swimmer Mia sets a phone reminder every Sunday morning for a 15-minute pool check. Her secret? She keeps extra shock treatment and new cartridges in a weatherproof box near the deck, so nothing gets delayed if the weather turns or her week gets busy. This works even for families juggling hectic schedules.
| Task | Frequency | Supplies Needed |
|---|---|---|
| Test and Adjust Water Chemistry | 1x/week | Test strips, chlorine, pH adjusters |
| Clean Filter | 2-4x/month | Replacement cartridges |
| Skim Surface | 1-2x/week | Skimmer net |
| Vacuum Pool | 2x/month or as needed | Auto vacuum or hose kit |
| Shock Pool | As needed | Shock treatment |
| Cover or Winterize | Seasonal | Pool cover, winter kit |
But there’s a catch many first-time owners never anticipate—especially when the weather suddenly shifts or relatives drop by for an unexpected swim party…
Budget Comparison: Which Models Deliver The Best Value
How do you pick the right above ground lap pool—one that actually delivers the best bang for your buck? Not all pools are created equal. Sometimes a feature-rich model costs less overall than a barebones option that saps your time and wallet over the years. Let’s compare the most popular choices side by side so you can make a smart investment for your backyard oasis.
| Model | Notable Features | Approximate Price Range |
|---|---|---|
| Fastlane® by Endless Pools | Adjustable swim current, modular design, premium liners | $9,000–$16,000 |
| Intex Ultra XTR Frame | Reinforced steel frame, large size options, easy setup | $1,500–$4,000 |
| Bestway Power Steel | Corrosion-resistant frame, filter pump included, budget-friendly | $1,200–$3,500 |
- Fastlane® by Endless Pools gives a true “infinite swim” feel and stands out for athletic training. The upfront cost is higher but it’s ideal for daily lap workouts and resale value is strong, according to the Pool & Hot Tub Alliance.
- Intex Ultra XTR Frame is a solid all-rounder for families who want both lap potential and recreational play. It’s simple to assemble, and replacement parts are widely available—saving frustration down the road.
- Bestway Power Steel hits the mark for budget-focused buyers who still want durability and decent size. Just expect a basic swim experience—no built-in current features here.
💡 Pro Tip: If you want long-term savings, factor in not just price but the cost of maintenance kits, upgrades, and energy efficiency. Sometimes, a mid-tier model becomes the real value winner after just a few seasons.
In practice: Picture this scenario—the Reynoso family invested in an Intex Ultra XTR because they wanted upfront affordability yet still wanted to enjoy longer swims and easy winter teardown. After three years, they calculated equipment and chemical costs and were surprised to find their total outlay was lower than friends who had picked bargain-basement pools that needed frequent repairs. Choosing based on total lifetime value—not just sticker price—made all the difference.
The right habits in place now make everything easier from here.
Your Lap Pool Journey Starts Here
If you take just one thing from this above ground lap pool guide, let it be this: the right pool, set up and maintained well, makes at-home swimming both affordable and genuinely enjoyable. You discovered what features really matter, how to install like a pro, and which models stretch your investment further. That’s what delivers real value for your backyard and your routine.
Before, daily laps felt out of reach—too expensive, too complicated, maybe just a dream. Now you know exactly how simple it can be to dive in. The hard parts are mapped out. All that’s left is to enjoy swims on your schedule, in your own space. You built the blueprint for swim-ready confidence—season after season.
Which lap pool feature or tip are you most excited to try at home? Drop your answer in the comments—I can’t wait to hear which part makes the biggest splash for you!

Marcus Lee Whitmore is a lap pool enthusiast and aquatic fitness writer dedicated to helping homeowners plan, install, maintain, and train in their home lap pools. With years of hands-on experience managing his own lap pool and endless pool system, Marcus built Ldesw to be the honest, practical resource every lap pool owner deserves from day one.